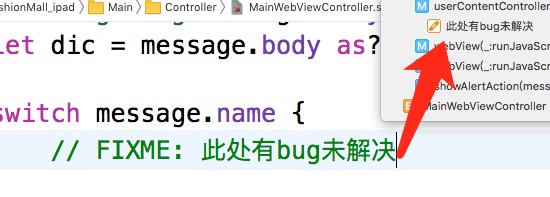
1.编译标记
Xcode将在导航栏显示出编译标记
// MARK: 你的标记

// TODO: 你的标记

// FIXME: 你的标记

TODO:标记和MARK:标记图标很像,区别比较的地方就是TODO:有缩进,MARK:类似于大标题
FIXME:标记图标是一个屎黄色的笔,同样有缩进,同其他标记相比较更为明显更为突出
注释
//===============
// circle layer
//===============
2.do 示例 猜测是代码块,使代码结构更清晰
extension AppDelegate {

    fileprivate func setupConfig() {

        do /** KingFisher Config */ {
            ImageCache.`default`.maxMemoryCost = UInt(30 * 1024 * 1024)
        }

        do /** Navgation Config */ {
            UINavigationBar.appearance().tintColor = Config.UI.titleColor
            UINavigationBar.appearance().isTranslucent = false
            UINavigationBar.appearance().barTintColor = Config.UI.themeColor
            UINavigationBar.appearance().titleTextAttributes = [NSForegroundColorAttributeName: Config.UI.titleColor]
        }

        do /** SideMenu Config */ {
            SideMenuManager.menuAnimationBackgroundColor = Config.UI.themeColor
            SideMenuManager.menuWidth = 100.0
            SideMenuManager.menuFadeStatusBar = false
        }
    }
}
这样写是不是看起来很清晰,很优雅,很有美感啊??当然因为有{}作用域的缘故,所以我们可以心安理得的使用同一个变量,代码搬运工,拷贝粘贴就是这么简单了,如下
do{
    let tap = UITapGestureRecognizer.init(target: self, action: #selector(self.imgButtonClick(gesture:)))
    imageV1.addGestureRecognizer(tap)
}
do{
    let tap = UITapGestureRecognizer.init(target: self, action: #selector(self.imgButtonClick(gesture:)))
    imageV2.addGestureRecognizer(tap)
}
3.给属性赋值,如果是一段代码块,可以考虑使用block
比如这段代码,很传统
let shapeLayer = CAShapeLayer()
let path = CGMutablePath.init()
path.move(to: CGPoint.init(x: lineFrame.midX, y: lineFrame.midY))
path.addLine(to: CGPoint.init(x: lineFrame.origin.x+lineFrame.size.width/2, y: lineFrame.origin.y))
shapeLayer.path = path
使用block写法
let shapeLayer = CAShapeLayer()
shapeLayer.path = {
    let path = CGMutablePath.init()
    path.move(to: CGPoint.init(x: lineFrame.midX, y: lineFrame.midY))
    path.addLine(to: CGPoint.init(x: lineFrame.origin.x+lineFrame.size.width/2, y: lineFrame.origin.y))
    return path
}()
有没有发现,咦,还可以这样子写???当然这并没有啥子好炫耀的,我们要注重这种写法所给予我们的思路,我们是注重内涵的人,注重代码本质的人,你换个马甲难道我就不认识你了??
4.快速书写tryCatch语法,输入docatch

do {
    try  throwing expression
} catch pattern  {
    statements
}
这是Xcode工具给我们提供便利,就像tableView的代理方法一样,只需要敲关键字即可
代码示例
let bgMusic = URL.init(fileURLWithPath: Bundle.main.path(forResource: "Ecstasy", ofType: "mp3")!)

do {
    //设置类别
    try AVAudioSession.sharedInstance().setCategory(AVAudioSessionCategoryPlayback)
    //设置静音状态下播放
    try AVAudioSession.sharedInstance().setActive(true)
    try audioPlayer = AVAudioPlayer.init(contentsOf: bgMusic)
    //缓冲
    audioPlayer?.prepareToPlay()
    audioPlayer?.play()
} catch let audioError as NSError {
    print(audioError)
}
6.避免成对的闭包写法
UIView.animate(withDuration: 0.1, animations: {
    ...
}) { (finished : Bool) in
    ...
}
这种成对的闭包,看起来非常恶心,大括号小括号连在一起,写代码的时候,小手一抖就容易删除一个括号,继而出现满屏红.而且语义又不清晰,不知道苹果开发者为啥子要这样设计
在第二个block块,尽量不要敲enter键,手动输入{},这样可读性更高
UIView.animate(withDuration: 0.1, animations: {
    ...
}, completion: { (finished : Bool) in
    ...
})
如果闭包代码太多,譬如业务逻辑比较多,写了七八十行,这样的代码看起来也是很恶心的,可以把闭包写成变量
let animations = {
    // 动画
}
let completion = { (finished: Bool) in
    // 回调
}
UIView.animate(withDuration: 0.1, animations: animations, completion: completion)
7.Swift 断言
抛异常 fatalError(“”),有时候封装一个库,要求外界传的参数必须要有值,如果使用者乱来,干脆咱就共赴黄泉
guard let safeValue = criticalValue else {
  fatalError("criticalValue cannot be nil here")
}
一个对代码有洁癖的coder,一个每每看到代码都有重构的冲动的的coder,我最大的愿望就是世界和平